

How to stop Fixing C Stage 1 in Windows 11/10
If y'all see a blackness screen with the Windows or OEM logo on the center of the screen with Fixing (C:) Stage 1 message across the bottom, then here'southward what yous need to do. It may non announced on a newly configured PC; yous might notice this text bulletin on an old computer running an former hard disk. Either style, you lot can gear up the result by following this tutorial.
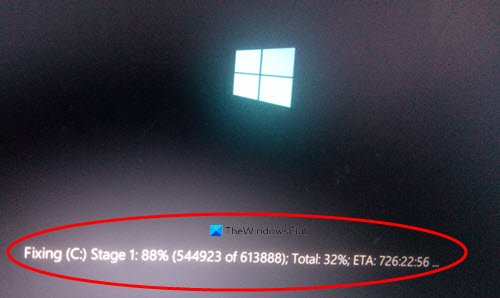
Your computer turns on, followed by showing either the OEM or Windows x logo on the screen. However, if it shows text – Fixing (C:) Stage 1: X% (n of north); Total: 10%; ETA: time, you might have some issues to deal with.
It is Disk Mistake Checking, which detects hard drive problems and fixes them on the go. It mainly appears on a PC configured with an quondam hard drive, and it implies that the ChkDsk is stuck at a particular stage.
Even so, the drive letter (C) can be dissimilar in your case. Instead of C or system drive alphabetic character, information technology tin show others, for example, D, E, etc. If it shows the C drive, you might have to worry as it is your system drive, where Windows 10 is installed. If it shows D or another bulldoze letter, y'all might not have to worry much.
Whether information technology displays C or D, you need to stop the ChkDsk process. Otherwise, it will go along happening whenever yous turn on your computer.
Fixing (C) Stage 1 mistake bulletin during boot
To end Fixing C Stage 1 in Windows xi/10, follow these steps-
- Press Win+R to open the Run prompt.
- Type regedit and hit the Enter button.
- Click the Yes option.
- Navigate to Session Managing director in HKEY_LOCAL_MACHINE.
- Double-click on BootExecute.
- Fix the Value data equally autocheck autochk /k:C *
- Click the OK button.
To learn more about these steps, go on reading.
Before getting started with the steps, it is recommended to create a backup of Registry files.
Press Win+R, type regedit, and press theEnterpush. It shows the UAC prompt on your screen. If then, click on theAyeselection to open Registry Editor. Once information technology is opened, navigate to the following path-
HKEY_LOCAL_MACHINE\SYSTEM\CurrentControlSet\Control\Session Manager
In theSession Manager, you can meet a Multi-String Value chosen BootExecute. By default, the Value data is set to autocheck autochk *. If y'all are getting problems with the C bulldoze, enter the Value data equally: autocheck autochk /k:C *.
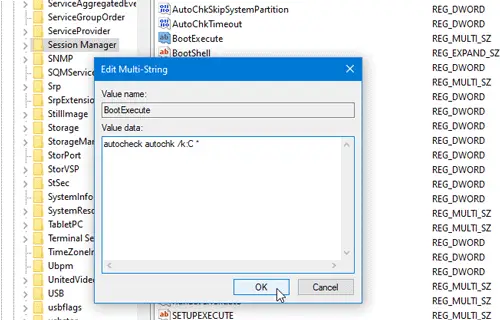
Click theOKpush to save the modify.
Even so, if information technology doesn't aid, practice follow the following suggestions:
- If you accept a very old hard drive and Windows eleven/x shows the issue with the C drive, it is improve to clone the drive and install Windows on another drive.
- If that doesn't help, yous tin inquire for help from a professional or change the hard disk drive.
Hope it helps.
Related: Reset BootExecute registry value to fix Windows Shutdown & Startup problems.

Source: https://www.thewindowsclub.com/how-to-stop-fixing-c-stage-1-in-windows-10
Posted by: larsonoffichat1937.blogspot.com
0 Response to "How to stop Fixing C Stage 1 in Windows 11/10"
Post a Comment